This piece reflects technical, hands-on work. I enjoy technical details, and believe that execution details matter in technology strategy – but the broader takeaway is how migration strategy, cost considerations, and operational risk intersect. –Scott
Note: The Azure platform is always evolving, so a sanity check against the most-recent Azure documentation is always a wise move.
Storage configuration is critical to SQL Server performance on an Azure VM, or anywhere really. Any solid DBA will tell you SQL Server’s performance is dependent on its storage; I’d even go further and say storage matters more than the CPU when it comes to SQL Server performance.
Keep in mind that on Azure VMs (or in any public cloud), storage does not come “included” – you add storage to your VM, and pay for it separately from the VM. And, there are many, many options and configurations for storage in Azure, just like there are for the VM itself.
And, there’s quite a bit to digest on storage when planning an Azure migration. We’ll cover here some of the larger considerations to help anyone planning a cloud migration better scope their storage for Azure SQL Server VMs.
Different Disks for Different Purposes
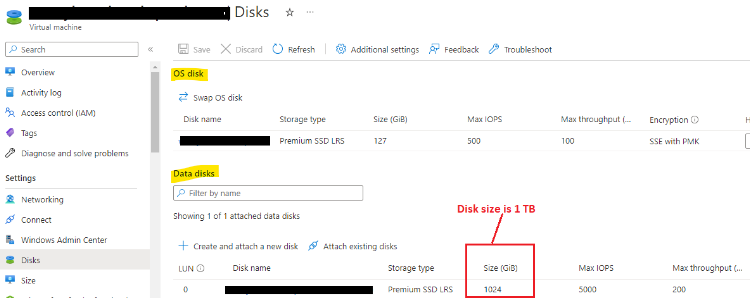
The first key here is to know you’ll need to add multiple “data disks” to your SQL Server Azure VM.
What’s a “data disk”? In Azure, the OS is a disk unto itself (the proverbial “C:” drive), and you can then tack on as many additional “data disks” as you like, up to the limit of your VM SKU. So, a “data disk” is any additional disk(s) beyond where the OS is going to live.
While you don’t have to add any “data disks” to your Azure VM (and can run just the OS disk), running SQL Server off the single OS disk is a VM version of the clown car. It’s going to look funny, act funny, be really uncomfortable, and ultimately not go very far.
Best practice here is to have one or more data disks for your data files (the MDF files), separate data disk(s) for your log files (the LDF files), and (depending on your backup strategy) separate data disk(s) for your backups. I discuss below why its important to have separate disks for your MDFs and LDFs, but you’re going to slow your reads down considerably if you combine them onto the same disk(s).
Of course, if you chose an Azure VM SKU that doesn’t support enough data disks for your SQL Server configuration, you’re doing it wrong.
Storage for Azure SQL Server VMs: Go Premium
There are different levels of Managed Disk offerings in Azure: Standard, Premium, SSD, HDD, etc.
You’re going to want to use the Premium SSD offering (the “P series”) for storage on your Azure SQL Server VMs. While you can run the slower and cheaper Standard SSD tier (the “E series”) in down-production environments, there’s no economic reason to sacrifice the speed on a production SQL Server. The rack price difference between a P30 and an E30 – a Premium SSD and Standard SSD of the same 1TB size – is only about $45/mo, while the speed differential is substantial.
You can also run Standard HDD, but you’re going to bring slow and consistent pain to your Azure SQL Server VM, and there’s no reason to stay stuck in the early 2000s with their spinny disks. There’s also an Ultra Disk offering – sub-millisecond latency, light your wallet on fire price – that frankly I’d probably only consider for a high-volume e-commerce site; like a Ferrari, there’s a place for it, but your daily office commute likely isn’t that place.
There’s also a Premium SSD v2 tier, which I’m going to mention, but leave up to you. It’s faster than normal Premium SSD, but not as fast (or as prohibitively expensive) as Ultra Disk. To use it, however, your Azure VM must be what’s known as a “zonal VM“. Discussion on Azure zonal VMs are beyond the scope of this post (and could result in additional costs); for now, it’s enough to know you’ll have to configure a zonal VM if you’re considering Azure’s Premium SSD v2 managed disks.
Watch The Throttle
Each Managed Disk comes with metrics called IOPS (input/output per second) and throughput. The higher these metrics are, the faster your Azure SQL Server VM will go.
But, no matter how much performance your Managed Disk(s) offer, you cannot go faster than the VM itself will allow. The VM SKU you chose will come with its own limits on IOPS and throughput, and the VM will throttle down disk performance so as to not go higher than the VM.
The math here can get a bit complex, though, because of something discussed below – if you use Storage Spaces (and I think you should), the IOPS and throughput for each logical drive (which can have more than one Managed Disk behind it) needs to be added together across all disks in that array, with that sum (instead of each disk’s individual limits) then being compared to the VM limits.
For example, if you deploy Storage Spaces to create a D: drive backed by three P30 disks (each at 1TB, for a 3TB total D: drive), you’ll net a max IOPS for the D: drive of 15,000 (5,000 per disk x 3). If you are using D: for your MDF files, and your VM SKU has a 6,500 IOPS limit, then the VM will throttle the D: drive down to 6,500 IOPS (and you won’t hit your 15,000 number).
Storage Spaces
This is not so much an Azure VM configuration item as it is a Windows OS configuration item, but: Make sure to create the logical disk drive for the data files (the MDFs), and the separate logical disk drive for the log files (the LDFs), using the built-in Windows disk array tool known as “Storage Spaces“.
Even if you’re just mounting one Managed Disk for each logical drive, still set up Storage Spaces to save yourself potential headaches later (you cannot easily create it later!).
While Storage Spaces has its own unique considerations beyond what we can cover here, the point is that you need to plan for tacking on additional storage as your MDFs or LDFs grow over time.
While you can always grow a single Managed Disk’s size in Azure, that isn’t necessarily the approach you’ll want to take for more space – because (spoiler alert!) you need to enable the disk setting for “Read Only” cache on those Managed Disk(s) comprising the logical drive where you’re storing your data files (e.g. the MDFs). And, in Azure you cannot enable the Read Only cache on any Managed Disk greater than 4TB in size (e.g. the P50 or E50).
Read-Only Cache
Final recommendation for storage on Azure SQL Server VM is to ensure you enable the “Read Only” cache setting on each Managed Disk (could be one, could be more) that you’ve used to mount the logical drive where your data files (the MDFs) will be located. For example, if three Managed Disks were used to create your D: drive (and your MDFs reside on that D: drive), you should turn on the Read Only cache for each of those three Managed Disks.
Enabling the Read Only cache allows SQL Server to use, well, the VM cache for its reads. Without going into any specifics of how the VM cache works, just know that using the cache speeds up the reads for your SQL Server Azure VM, and considerably.
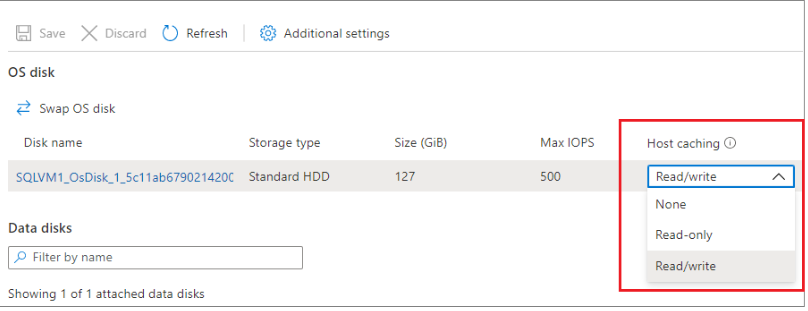
Also, some closing words of caution here: Only turn the Read-Only cache on for the Managed Disks housing your MDF files, do not turn it on for the Managed Disks housing your LDF files, and do not turn on the “Read/Write” cache option on any data disk (but note the “Read/Write” cache option is, and should stay, enabled for the OS disk). Note again, if you’re co-mingling your MDF and LDF files on the same Managed Disk(s), you’re doing it wrong.
With the above in hand, you should be on good starting ground as you design storage for Azure SQL Server VM.
But, it’s still important to know there’s a metric ton left unsaid here – we haven’t touched disk encryption, bursting, shared disks, snapshot considerations, redundancy levels, something called “Write Accelerator” (on M-Series VMs), cached vs. uncached operations, and so much more.
Also, keep in mind that none of the above applies to TempDB (data files or log files), which should be housed on your Azure VM’s temporary disk (something we’ll talk about later), and not on any “data disk”. (I mean, it’ll work if you put TempDB on the data disks. It’s more that it will work so much faster when housed on the temporary disk.)
Finally, something I learned the hard(ish) way: Make sure to properly size your storage, and don’t over-provision it thinking you’ll just shrink it later. In Azure, it’s easy to resize any disk upwards (which can even be done hot with some PowerShell magic!), but you are not allowed to size a disk down (you instead have to build a new Managed Disk, most likely using a snapshot).
– Scott